Install Server Agents on Linux
EdgeBit can most effectively focus your vulnerability management and supply chain security when workloads are mapped all the way to running in production.
The EdgeBit agent fulfills two main purposes:
- Build a real-time software bill of materials for the server:
- OS packages
- apps
- containers
- Track usage of packages and files related to those workloads
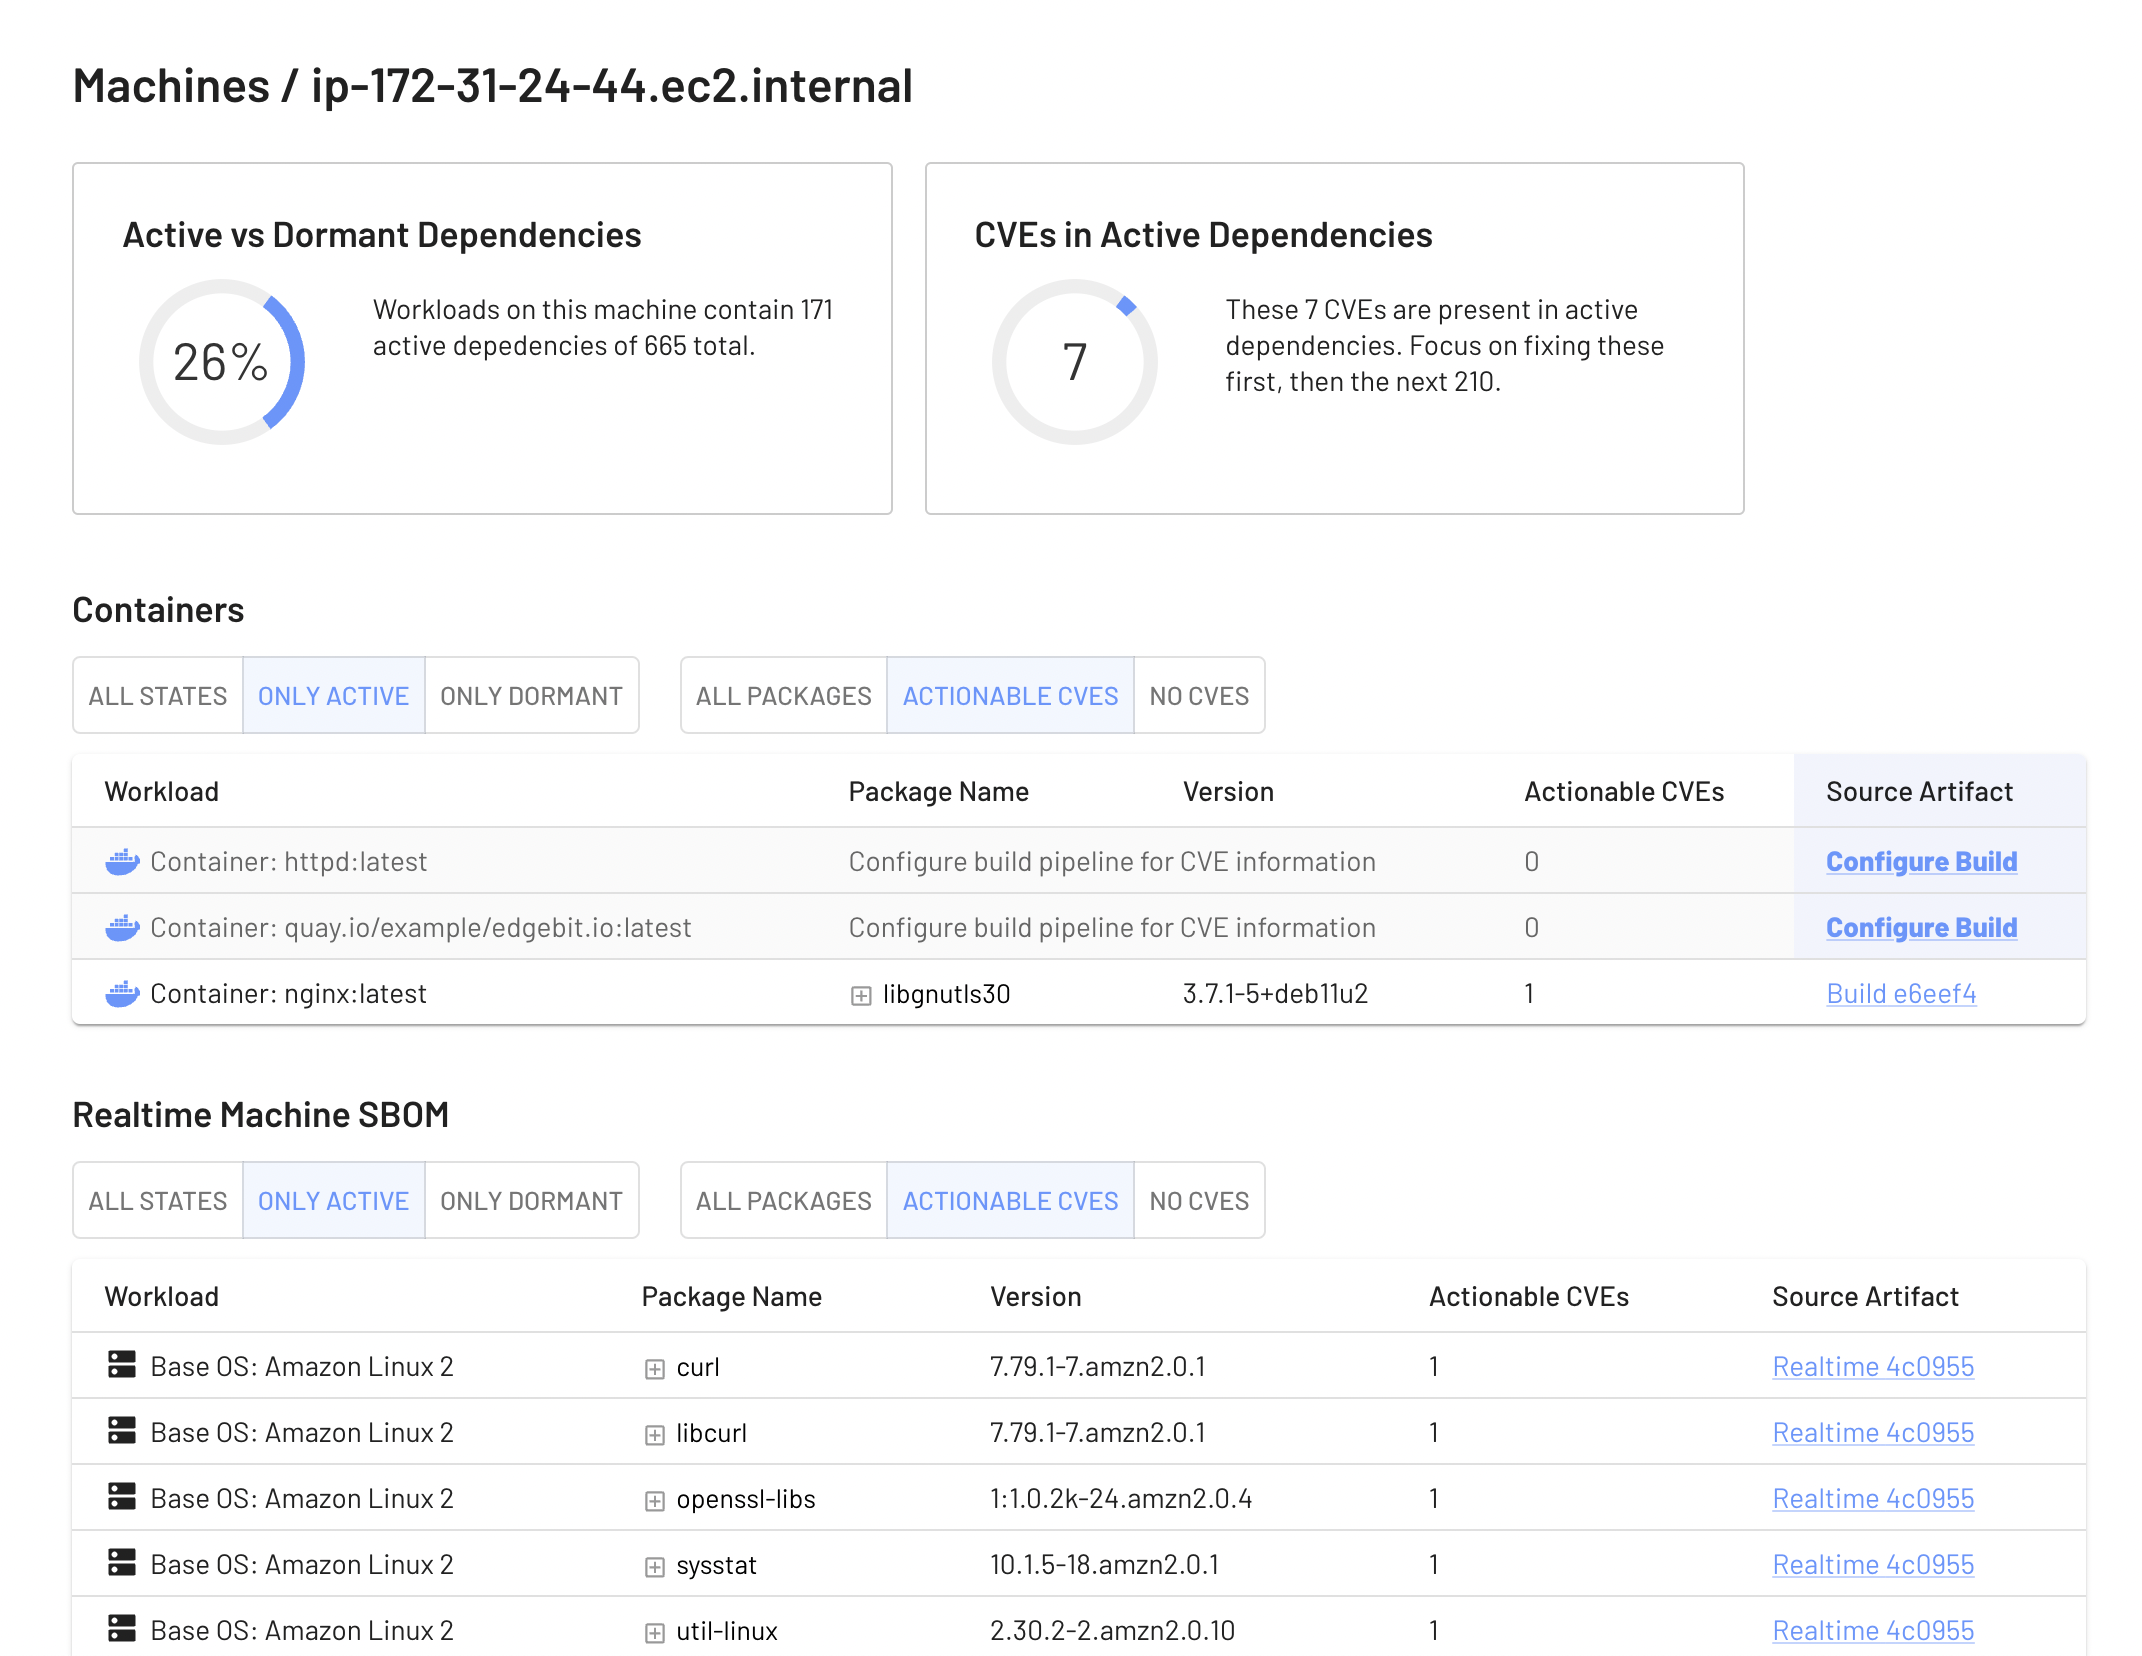
Here’s an example report for a live machine:
System Requirements
EdgeBit uses eBPF to observe your workloads running all the way into the Linux kernel. This drives many of the minimum requirements:
- x86 or ARM64 system
- Linux kernel v4.20+
- RHEL 9+
- CentOS 9+
- Fedora 30+
- Ubuntu 10.04+
- FlatCar Linux 2605.10.0+
- run as root (required to install eBPF probes)
- Docker, Podman or containerd runtime
- if container, run as privileged (required to install eBPF probes)
- about 100MB of memory
Installation
First, generate a new agent deployment token from the EdgeBit Console under “Access Tokens”. Choose the “Node Agent” type, which is a narrowly scoped secret used as a refresh token to obtain a new set of credentials unqiue to this agent instance. The new credentials are used to send data to EdgeBit so you can bake this credential in a VM image template.
For quick trials, you can get the latest release, create a systemd unit and start it. First, SSH to your server:
Next, run the install command. Be sure to insert your agent deploy token as EDGEBIT_ID and your organization’s URL as EDGEBIT_URL:
export EDGEBIT_ID=dnrekvq95CJ6_JcVixpfTEx8L3k3hDsggoqSr
export EDGEBIT_URL=https://orgname.edgebit.io
curl https://install.edgebit.io | sudo -E sh
We recommend graduating to using a package manager as soon as possible. You can optionally use VERSION to control the agent version installed.
EdgeBit ships both RPM and Debian packages. This is the preferred installation method because EdgeBit can start observing your system as early as possible at boot.
View the GitHub releases for the latest release, or run the curl commands below.
RPM
$ curl -sL $(curl -s https://api.github.com/repos/edgebitio/edgebit-agent/releases/latest | jq -r ".assets[] | select(.name|match(\"^edgebit-(.*)$(uname -m).rpm$\")) | .browser_download_url") -o edgebit-agent.rpm
$ sudo rpm -i edgebit-agent.rpm
Debian Package
$ curl -sL $(curl -s https://api.github.com/repos/edgebitio/edgebit-agent/releases/latest | jq -r ".assets[] | select(.name|match(\"^edgebit-(.*)$(uname -m | sed -e s/x86_64/amd64/ -e s/aarch64/arm64/).deb$\")) | .browser_download_url") -o edgebit-agent.deb
$ sudo dpkg -i edgebit-agent.deb
Don’t start it yet, we need to fill out the configuration.
EdgeBit can also be run via a container or with Kubernetes. This is the less perferred installation method due to less control over how early your container runtime starts.
Your container must run as privleged in order to load the eBPF program. Be sure to insert your agent deploy token as EDGEBIT_ID and your organization’s URL as EDGEBIT_URL:
$ docker run \
  --name edgebit-agent \
  --rm \
  -d \
  --privileged \
  --pid host \
  --mount "type=bind,source=/,destination=/host" \
  --mount "type=bind,source=/etc/edgebit,destination=/etc/edgebit" \
  --mount "type=bind,source=/sys/kernel/debug,destination=/sys/kernel/debug" \
  --mount "type=bind,source=/run/docker.sock,destination=/run/docker.sock" \
  --mount "type=volume,source=var-edgebit,destination=/var/lib/edgebit" \
  -e "EDGEBIT_ID=YOUR_DEPLOYMENT_TOKEN" \
  -e "EDGEBIT_URL=https://YOUR_ORG.edgebit.io" \
  edgebit-agent:latest --hostname "$(hostname)"
There is no need to use the config file with the container due to the environment variables.
Configuration File
The configuration file is stored at /etc/edgebit/config.yaml and the quick install script will fill it out for you.
Otherwise, insert your edgebit_id and edgebit_url:
| Variable Name |
Description |
Required |
edgebit_id |
EdgeBit agent deploy token |
Required |
edgebit_url |
EdgeBit organization address, as FQDN |
Required
https://orgname.edgebit.io |
syft_config |
Syft configuration for scanning the machine |
Required
/opt/edgebit/syft.yaml |
syft_path |
Syft binary to use for scanning the machine |
Required
/opt/edgebit/syft/syft |
Here’s a complete example:
edgebit_id: "dnrekvq95CJ6_JcVixpfTEx8L3k3hDsggoqSr"
edgebit_url: "https://orgname.edgebit.io"
syft_config: "/opt/edgebit/syft.yaml"
syft_path: "/opt/edgebit/syft/syft"
Start the Agent
Now you’re ready to start the agent:
$ sudo systemctl start edgebit-agent.service
Troubleshooting
To start troubleshooting, first check the status of the systemd unit:
$ systemctl status edgebit-agent.service
● edgebit-agent.service - EdgeBit Agent
   Loaded: loaded (/usr/lib/systemd/system/edgebit-agent.service; enabled; vendor preset: disabled)
   Active: active (running) since Sun 2023-02-26 14:30:24 UTC; 26min ago
 Main PID: 24828 (edgebit-agent)
    Tasks: 3
   Memory: 20.3M
   CGroup: /system.slice/edgebit-agent.service
           └─24828 /opt/edgebit/bin/edgebit-agent
Incorrect Configuration
The most common issue is that you haven’t set your edgebit_id and edgebit_url in the config file. This will indicate a transport error in the systemd journal.
$ journalctl -u edgebit-agent -n 100 --no-pager
Feb 26 14:28:41 ip-172-31-24-44.ec2.internal systemd[1]: Started EdgeBit Agent.
Feb 26 14:28:41 ip-172-31-24-44.ec2.internal edgebit-agent[24740]: INFO  edgebit_agent > EdgeBit Agent v0.0.10
Feb 26 14:28:41 ip-172-31-24-44.ec2.internal edgebit-agent[24740]: INFO  edgebit_agent > Connecting to EdgeBit at https://orgname.edgebit.io
Feb 26 14:28:41 ip-172-31-24-44.ec2.internal edgebit-agent[24740]: status: Unknown, message: "transport error", details: [], metadata: MetadataMap { headers: {} }
...snip...
View your Machine in the EdgeBit Console
Immediately after installation, your machine should show up in the EdgeBit Console. After short period of intitial analysis, your real time results should be visible.
Next: Vulnerability Response