EdgeBit can most effectively focus your vulnerability management and supply chain security when workloads are mapped all the way to running in production.
To gather the most context when running Kubernetes clusters, EdgeBit uses two separate agents:
Although running both types of agents is preferred, deploying either one is sufficient to get started. Since the agents collect different types of data, running only one will reduce the level context about each workload.
The type of data that each agent collects is described in the sections below.
The EdgeBit node agent fulfills two main purposes:
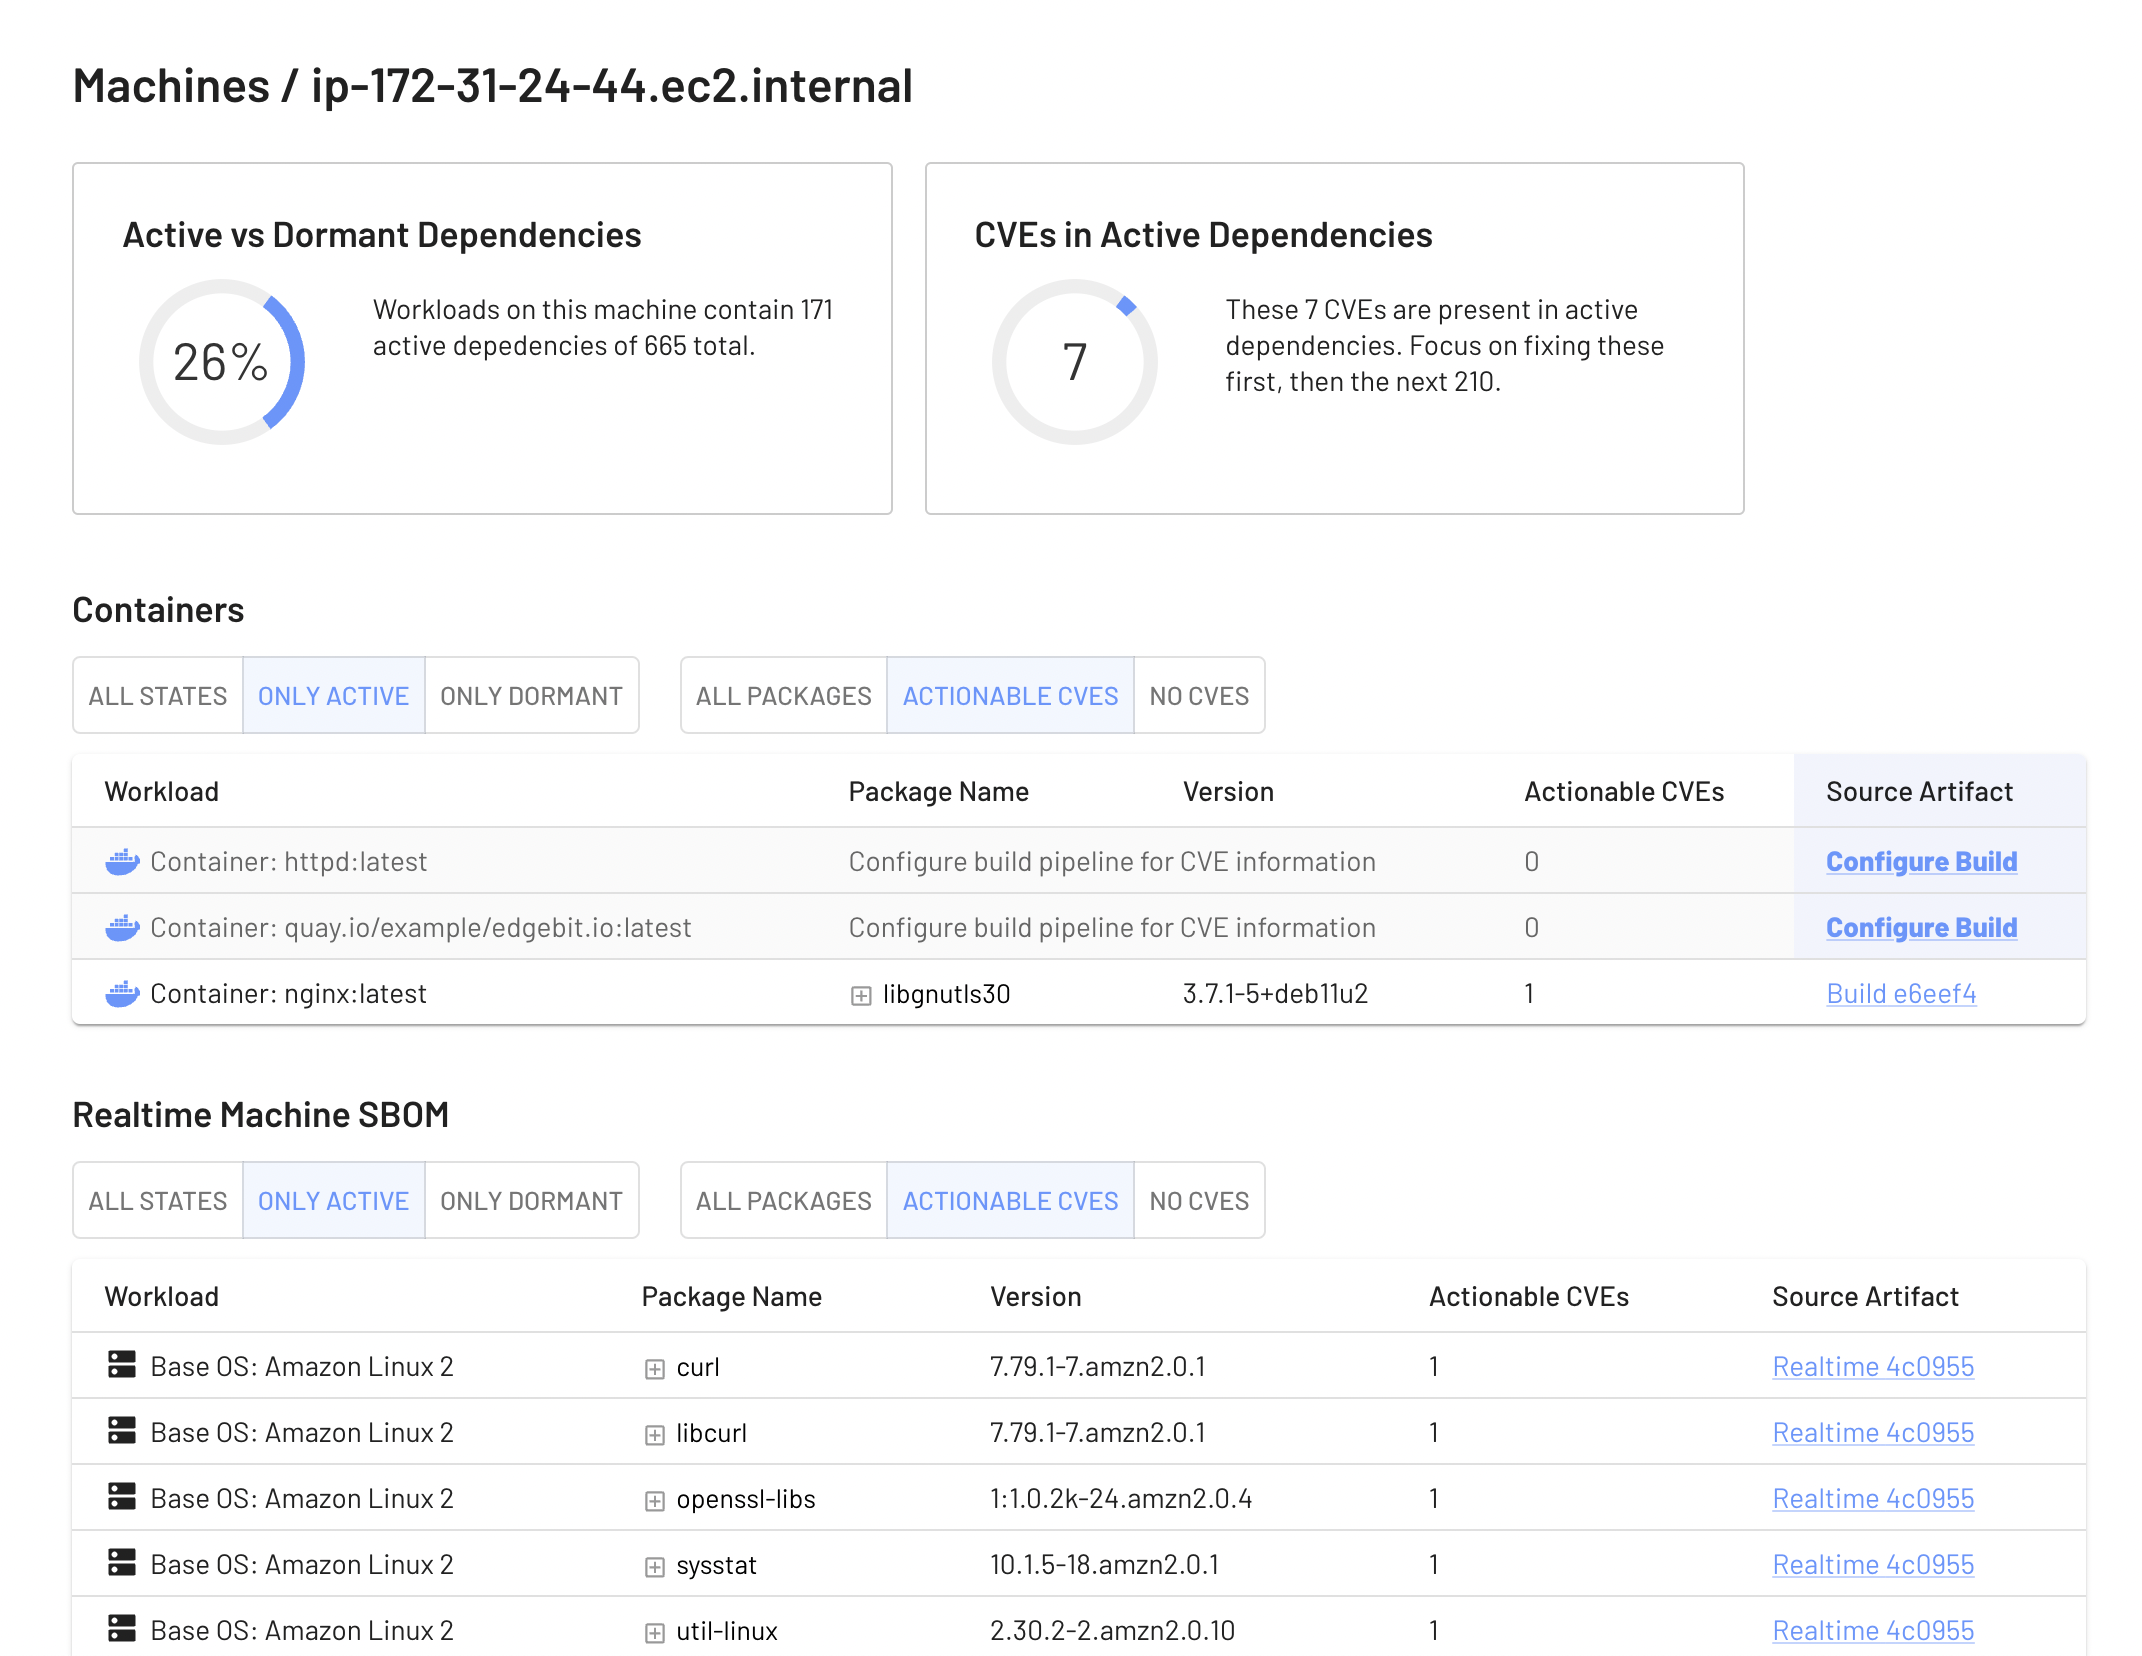
Here’s an example report for a live machine:
The EdgeBit cluster agent is responsible for:
EdgeBit uses eBPF to observe your workloads running all the way into the Linux kernel. This drives many of the minimum requirements:
Kubernetes requriements:
Kubernetes requriements:
Each of the agents requires a separate token, scoped to what they’re allowed to do. Navigate to the EdgeBit Console under “Access Tokens”.
Under “Agent Deployment Tokens”, create both a Node Agent and a Cluster Agent value. Give each a descriptive name and store the values in order to replace them in the YAML below.
These values can be safely shared across clusters if you practice centralized GitOps or they can be unique to your clusters — it’s up to you.
Replace the following placeholders:
| Variable Name | Description |
|---|---|
YOUR_ORG |
Organization name registered with EdgeBit during signup. |
YOUR_CLUSTER_NAME |
Arbitrary label for the Kubernetes cluster for organization in the UI. |
YOUR_NODE_AGENT_EDGEBIT_ID |
The node agent deployment token generated in the previous step. |
YOUR_CLUSTER_AGENT_EDGEBIT_ID |
The cluster agent deployment token generated in the previous step. |
Use the following template to create config.yaml file:
apiVersion: v1
kind: Namespace
metadata:
  name: edgebit-system
  labels:
    pod-security.kubernetes.io/enforce: privileged
    pod-security.kubernetes.io/enforce-version: latest
---
apiVersion: v1
kind: ConfigMap
metadata:
  name: edgebit-agent-config
  namespace: edgebit-system
  labels: {}
data:
  edgebit-url: https://YOUR_ORG.edgebit.io
  cluster-name: YOUR_CLUSTER_NAME
---
apiVersion: v1
kind: Secret
metadata:
  name: edgebit-agent-api-key
  namespace: edgebit-system
  labels: {}
type: Opaque
stringData:
  edgebit-id: YOUR_NODE_AGENT_EDGEBIT_TOKEN
---
apiVersion: v1
kind: Secret
metadata:
  name: cluster-agent-api-key
  namespace: edgebit-system
type: Opaque
stringData:
  edgebit-id: YOUR_CLUSTER_AGENT_EDGEBIT_TOKEN
Then submit it to the cluster:
$ kubectl create -f config.yaml
namespace/edgebit-system created
configmap/edgebit-agent-config created
secret/edgebit-agent-api-key created
secret/cluster-agent-api-key created
Next, create the DaemonSet that corresponds to your Kubernetes platform. It will run the agent with the correct settings for the platform. No edits are needed in this file.
| Kubernetes Platform | DaemonSet File |
|---|---|
|
daemonset.yaml |
|
daemonset-k3s.yaml |
|
daemonset-norealtime.yaml |
Start the DaemonSet:
$ kubectl create -f daemonset.yaml
daemonset.apps/edgebit-agent created
$ kubectl create -f https://raw.githubusercontent.com/edgebitio/cluster-agent/main/dist/deployment.yaml
clusterrole.rbac.authorization.k8s.io/workload-reader created
clusterrolebinding.rbac.authorization.k8s.io/workload-reader-binding created
deployment.apps/cluster-agent created
To start troubleshooting, first check the status of the DaemonSet and Deployment:
$ kubectl -n edgebit-system describe ds/edgebit-agent
...snip...
Events:
  Type    Reason            Age   From                  Message
  ----    ------            ----  ----                  -------
  Normal  SuccessfulCreate  35s   daemonset-controller  Created pod: edgebit-agent-qws2l
$ kubectl -n edgebit-system describe deploy/cluster-agent
...snip...
Events:
  Type    Reason             Age   From                   Message
  ----    ------             ----  ----                   -------
  Normal  ScalingReplicaSet  18s   deployment-controller  Scaled up replica set cluster-agent-7b77dbf46c to 1
The most common issue is that you haven’t set your edgebit_id and edgebit_url in the config file. This will indicate a transport error in the pod logs.
$ kubectl logs pods/edgebit-agent-qws2l
...snip...
INFO  edgebit_agent > Connecting to EdgeBit at https://orgname.edgebit.io
status: Unknown, message: "transport error", details: [], metadata: MetadataMap { headers: {} }
Immediately after installation, your machine and workloads should show up in the EdgeBit Console. After short period of intitial analysis, your real time results should be visible.