EdgeBit gives developers context about new and modified software dependencies when submitted a pull request or pushing a new commit before it merges into main.
This context is useful for:
This document will walk through setting up an AWS CodeBuild project.
The action uses the Syft open source project to generate the software bill of materials (SBOM).
Follow the prompts to create a new project if you don’t have an existing one. Ensure that the Privileged option is checked under the Environment settings. This is required to build container images in your project.
This example is a minimal example of a container build. For an existing project, mix these commands in where it makes sense. Here’s what it does:
ebctl and SyftIn your code repo, create ./edgebit/container-syft.yaml with the default config file.
$ mkdir -p .edgebit
$ curl -sL https://edgebit.io/docs/0.x/assets/container-syft.yaml > ./edgebit/container-syft.yaml
In your GitHub repo, create or edit your buildspec.yml:
version: 0.2

env:
  shell: bash
  variables:
    IMAGE_TAG: "1.2.3"
    IMAGE: "registry.example.com/projectname"
    NAME: "projectname"
    EDGEBIT_URL: "https://example.edgebit.io"
    GH_REPO: "https://github.com/example/projectname"
    EBCTL_VERSION: v0.8.1
  secrets-manager:
    EDGEBIT_API_KEY: example.edgebit.io/EdgeBitAPIKey

phases:
  install:
    commands:
      # Install ebctl
      - curl -sSfL "https://install.edgebit.io/releases/edgebit-cli/${EBCTL_VERSION}/edgebit-cli_Linux_$(uname -m | sed 's/aarch64/arm64/').tar.gz" | tar xz
      # Install syft v1.4.0
      - curl -sSfL https://raw.githubusercontent.com/anchore/syft/main/install.sh | sh -s -- -b . v1.4.0
  pre_build:
    commands:
      - LATEST_SHA=$(git rev-parse HEAD)
      - FULL_IMAGE="$IMAGE:$IMAGE_TAG"
      - PR_NUMBER=$(cut -d "/" -f2 <<< "$CODEBUILD_SOURCE_VERSION")
  build:
    commands:
      - docker build -t $FULL_IMAGE .
      # Generate SBOM
      - ./syft \
        scan $FULL_IMAGE \
        --config ./edgebit/container-syft.yaml \
        --output spdx-json=$NAME.spdx.json
      # Upload SBOM to component
      - |
        ./ebctl upload-sbom \
          --component $NAME \
          --tag latest \
          --tag $IMAGE_TAG \
          --repo $GH_REPO \
          --commit $LATEST_SHA \
          --image-tag $FULL_IMAGE \
          --image-id $(docker image inspect --format '{{.ID}}' $FULL_IMAGE) \
          --repo-digest $(docker image inspect --format '{{join .RepoDigests ","}}' $FULL_IMAGE) \
          --pull-request $PR_NUMBER \
$NAME.spdx.json Fill in the required inputs at the top of the file under env:
| Input Name | Description | Value |
|---|---|---|
IMAGE |
Container image to be built, including registry and name | Requiredregistry.example.com/projectname |
IMAGE_TAG |
Tag of the container image to be built | Requiredlatest |
NAME |
Short name of the project | Requiredprojectname |
GH_REPO |
Location of the code repository | Requiredhttps://github.com/org/reponame |
EDGEBIT_URL |
EdgeBit organization url | Requiredhttps://foo.edgebit.io |
EDGEBIT_API_KEY |
EdgeBit access token | Required |
For simplicity this example is hardcoded to append the latest tag for SBOM in addition to the tag from the container. This indicates the newest build in the EdgeBit UI. More advanced logic can be substituted and used in the ebctl upload-sbom command.
In the EdgeBit Console, generate a new Access Token for this project to use. You can find this in the left hand navigation under “Access Tokens”.
Save the new EdgeBit Access Token in the AWS Secret Manager as a plaintext value (not key/value). This value is referenced at the top of our buildspec.yml, so please update it with the name. Note the ARN, since we’ll use that in the IAM policy.
Next, add an IAM policy to the automatically generated Role used by this CodeBuid project. To do this manually, navigate to the IAM section and search for “codebuild” in the Role list. It should be something like codebuild-<projectname>-service-role.
Here’s an example role that should contain your secret’s ARN. If your organization uses automation to manage your AWS infrastructure, please follow those best practices.
{
  "Version": "2012-10-17",
  "Statement": [
    {
      "Sid": "ReadEdgeBitKey",
      "Effect": "Allow",
      "Action": [
        "secretsmanager:GetResourcePolicy",
        "secretsmanager:GetSecretValue",
        "secretsmanager:DescribeSecret",
        "secretsmanager:ListSecretVersionIds"
      ],
      "Resource": "arn:aws:secretsmanager:us-east-1:11223344556677:secret:xxxxxxx"
    }
  ]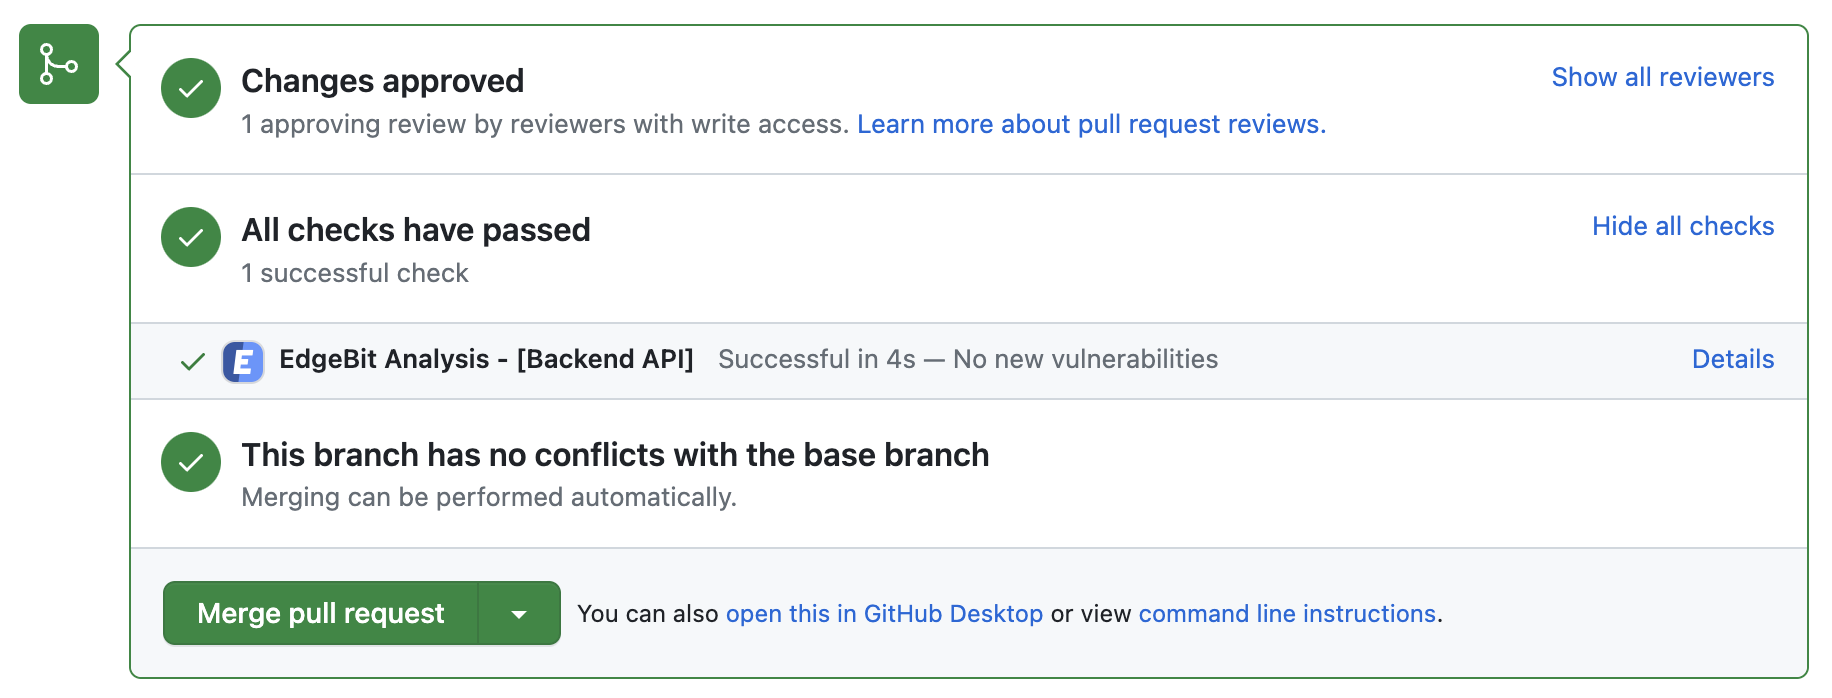
}Optionally, use the EdgeBit’s GitHub app to allow Developers to see a new EdgeBit check on their PRs:
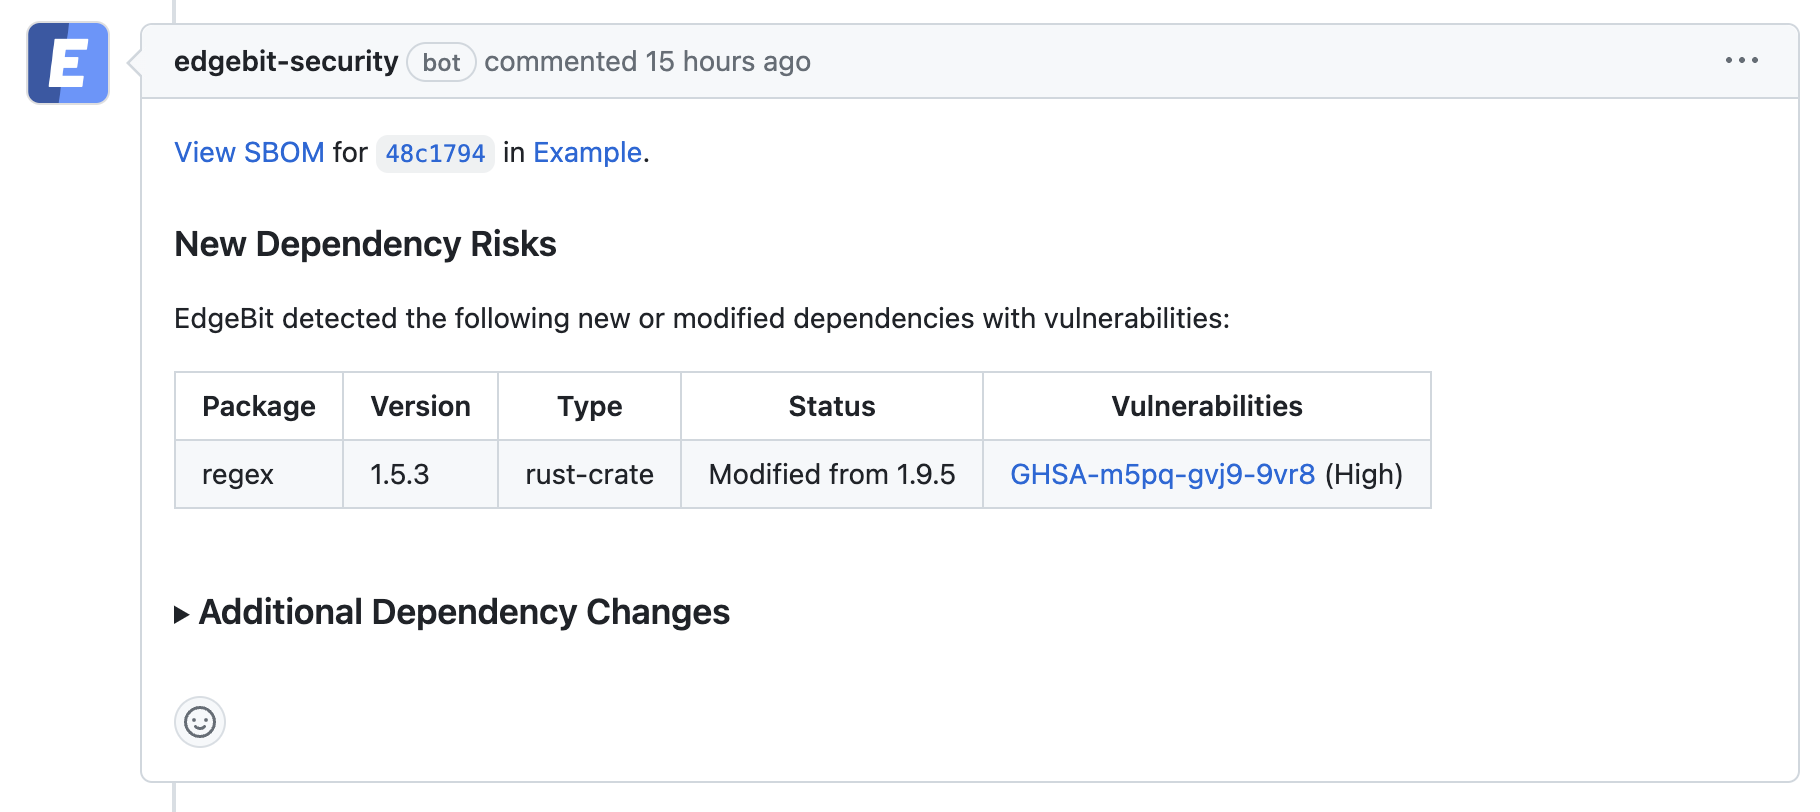
If a PR makes dependency changes and new issues are found, EdgeBit will comment with more information:
To set up the GitHub app, an admin should do the following:
Click “Start Build” to run your first build off the latest code. Be sure the repository contains your customized buildspec.yml.
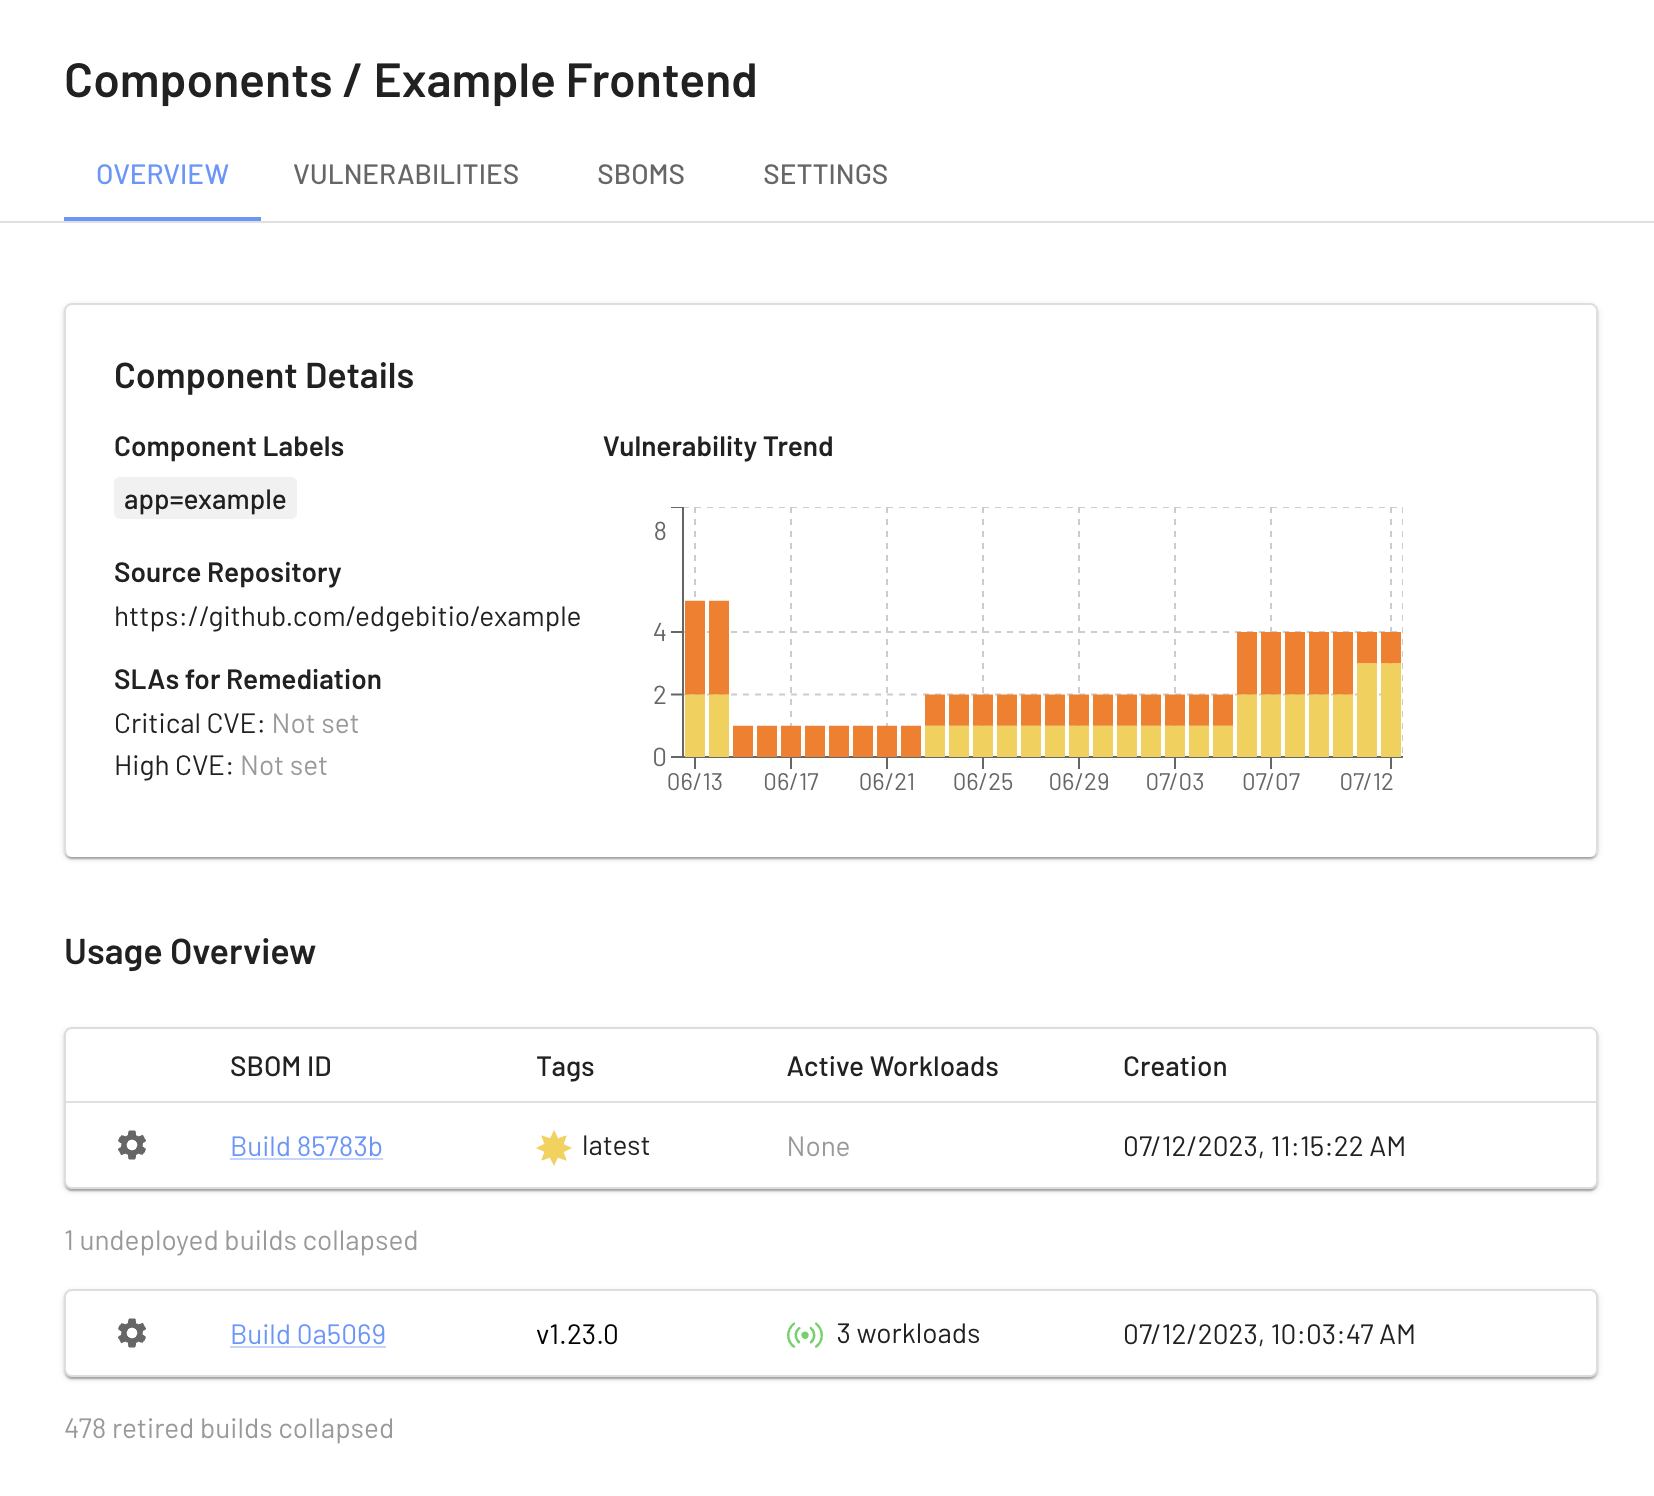
Your EdgeBit Console contains reports about each SBOM uploaded and the current state of all vulnerabilities in your software Components.